Design tolerances are an essential aspect of quality assurance and quality control. Engineers and quality specialists know that manufactured parts rarely measure exactly the same as the design dimension. In machining, this could mean slightly too little or too much material is removed, creating parts that are sometimes only a fraction of a millimeter larger or smaller than the design value.
But how much is a given dimension allowed to deviate from the design value before it becomes unacceptable and the part is rejected? To ensure quality specialists know whether to pass or fail a part during an inspection, designers use engineering tolerance to determine the range of acceptable values for a particular dimension.
The two most common tolerances are bilateral tolerance and unilateral tolerance. This article explains the difference between these two types of engineering tolerance and gives examples of how they impact measured dimensions.
What is Bilateral Tolerance?
Bilateral tolerance describes the acceptable range of variance around a base value in both the positive and negative directions. You can have a bilateral tolerance that is either equal or unequal.
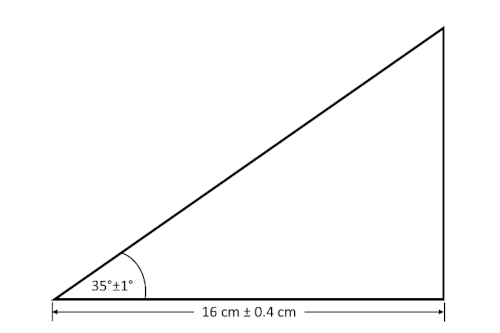
Generally, equal bilateral tolerance is the most commonly cited engineering tolerance. Its range extends an equal amount in both directions from the nominal value. The following image shows dimensions with equal bilateral tolerances.

Example #1: Equal bilateral tolerances.
In Example #1, the ranges of acceptable values are:
- Angle: 34° – 36°
- Length: 15.6 cm – 16.4 cm
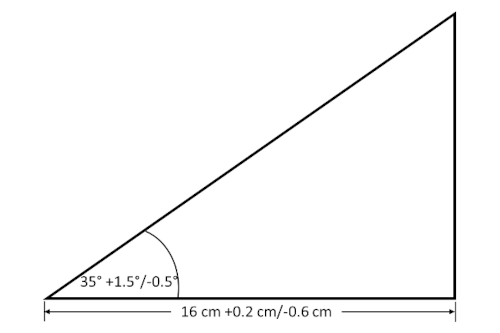
When designers need to specify ranges that are unequal about the base value, they use an unequal bilateral tolerance. Sometimes referred to as unequally disposed tolerances, they include positive and negative values that are different from one another.

Example #2: Unequal bilateral tolerances.
In Example #2, the ranges of acceptable values are:
- Angle: 34.5° – 36.5°
- Length: 15.4 cm – 16.2 cm
There is also a special type of unequal bilateral tolerance that occurs when just one of the tolerance values is zero: unilateral tolerance.
What is Unilateral Tolerance?
As mentioned above, a unilateral tolerance shows that a value’s acceptable range of variance extends in only one direction. A unilateral tolerance value is either positive or negative relative to the nominal value.
While not as common as equal bilateral tolerances, unilateral tolerances are very useful for closely mating parts. For example, a machined hole that accepts a pin with a maximum diameter of 1” must have a minimum diameter of 1”. By ensuring the tolerance ranges for these mating parts do not overlap, you can guarantee they will fit together.
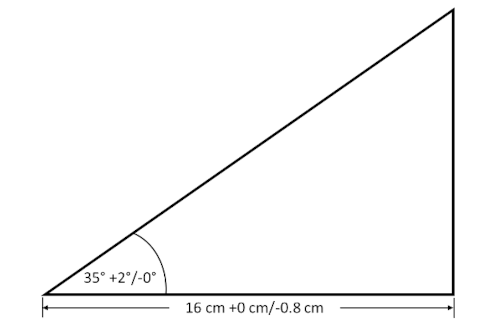
Example #3 shows dimensions with unilateral tolerances.

Example #3: Unilateral tolerances.
In Example #3, the ranges of acceptable values are:
- Angle: 35° – 37°
- Length: 15.2 cm – 16.0 cm
Other Types of Design Tolerance
In addition to unilateral and bilateral tolerance, there are a number of other engineering tolerances useful for describing specific quality restrictions.
Properties like straightness, circularity, flatness, and parallelism are all geometric tolerances. Applying a geometric tolerance is useful for ensuring parts don’t deviate excessively from a desired shape. For example, a long rod might need to have a high degree of straightness and circularity to ensure it fits through a series of aligned holes.
Compound tolerance is another form of tolerance that someone may use to describe the maximum variance that occurs in one dimension based on the combined effects of given tolerances for other dimensions. For example, the hypotenuse of the triangle in Example #3 has an approximate compound tolerance of 19.3 cm ±0.7cm.
Summary
Unilateral and bilateral tolerance are valuable tools for engineers to describe acceptance criteria to quality control specialists. They can even be used to develop custom go/no-go gauges that help streamline quality inspections. Learn more about machining tolerances.
The examples in this article provide an overview of the most common engineering tolerances, but anyone looking to learn more about standard tolerance notations can refer to a specific Geometric Dimensioning and Tolerancing (GD&T) system, like those provided by the ISO or ASME.
And if you’re searching for expert machining services that offer the highest level of quality assurance, look no further than the CNC machining services offered by Gensun.


